Overview
In our tutorial, we will control sensors and actuators from Flash
through the Arduino physical computing platform. Flash cannot talk
directly to the Arduino hardware, so you'll have to install some extra
pieces of software: an Actionscript library for Flash that
sends/receives Arduino commands over a network socket; a proxy server
that translates network packets into serial bytes; and a hardware driver
to connect to the serial port on the Arduino board.
NOTE: the following tutorial was put together with content from two sources, both of which may be helpful in troubleshooting, along with some additional modifications. These are:
http://cote.cc/blog/interfacing-flash-and-arduino-from-scratch-part-1
http://protolab.pbworks.com/TutorialFlashSetup2009
arduino file to launch the IDE. Connect your Arduino board to your computer using the USB cable. Your computer SHOULD recognize the device as new hardware and install the correct drivers. Windows users may need to select the driver if prompted. This is included in the Arduino package in the drivers\FTDI USB Drivers folder.
Note: If you already had an older version of the Arduino IDE installed on your computer, you may need to delete your existing Arduino preferences.txt file. The location of your preferences file is shown under Arduino->Preferences (OSX) or File->Preferences(Win) in the Arduino IDE. Write down this path. Close Arduino IDE. Find the preferences.txt file on your drive and delete it manually (while Arduino is NOT running) - Arduino will re-create it on the next startup.
Make sure your installation is working correctly so far. Now that your Arduino board is plugged in and the IDE software is running, let's configure Arduino to use the right serial port. Go to Tools->Serial Port. On the Mac, choose the entry that reads /dev/cu.usbserial-XXXXXXXX (the example below shows /dev/tty. This will also work, but for connecting to Flash you must use /dev/cu). On Windows, it's likely the highest COM port number (COM4 for example).
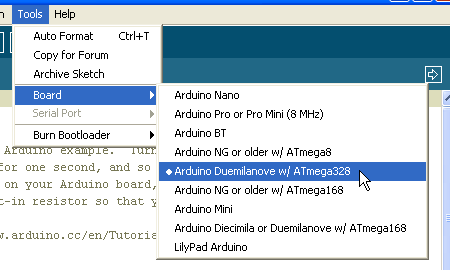
Also make sure you have selected the right board and port from the "Tools" menu.
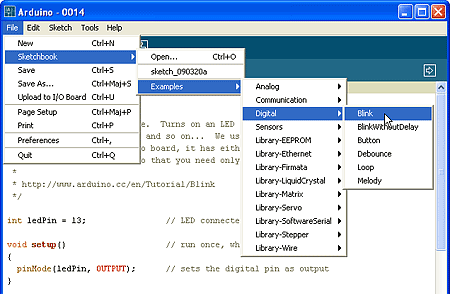
To make sure everything is set up properly, open the "Blink" sketch from the File menu :
A sketch is simply code that you want the Arduino to run. With the "Blink" sketch open, go to the File menu and select "Upload to I/O Board". This will upload the "Blink" code to the unit. After a few moments, you should see LED (L) blinking on the Arduino.
as3Glue uses socket connections to talk to a serial proxy. By default, SWF files built by Flex or Flash run in a security sandbox that prevents most socket communication. If you run your files directly in the Flash IDE, you are fine. If you want to execute your files outside the Flash IDE (like from within Flash), you have to modify the "Global Flash Player Trust directory" and add project directories where restrictions are not enforced.
serproxy.cfg file to match your system. Edit your file so it corresponds to the right COM port and TCP/IP port. For
example, on a Windows system, Arduino may be on COM port 4 and serproxy is
listening for connections on TCP/IP port 5331 (on a Mac these will likely be COM port 1 and TCP/IP port 5331).
NOTE: Avoid using wordpad for editing this file since it will sometimes add additional character to the file without your knowing. Best to use textedit (mac) or notepad (pc). Your file should essentially look like this:
comm_ports=4
net_port4=5331

comm_baud=57600
comm_databits=8
comm_stopbits=1
comm_parity=none
newlines_to_nils=false
timeout=300
Make sure to end the net_port parameter
with the matching COM port number. Depending on your Firmata version, the baud rate could be 115200 or 57600 but in the software we have described above it will likely be 57600. You can confirm that by looking at the standard_firmata.pde code in the Arduino IDE. Simply look for a setup() routine near the end of the code. Inside it, you should find the following line which will tell you the speed to use : Firmata.begin(57600);
OSX: in the case of Mac installations you will also have to include the lines: serial_device1=/dev/cu.usbserial-XXXXXXXX (to match the same as listed in the Arduino IDE). Do this by removing the "#" in front of the code line.
launch the serproxy application. If everything went well, you should see a command prompt window with something like :
Serproxy - (C)1999 Stefano Busti, (2005) David A. Mellis - Waiting for clients
This serproxy.exe process needs to be running all the time. At least, as long as you want Flash to communicate with your Arduino.
At the same time, the serial proxy window should have printed: server thread launched
You are ready to go!
Your FTDI USB driver is not installed correctly. Re-install and reboot to be safe.
If you get the following error in the Flash output window
Error #2044: Unhandled IOErrorEvent:. text=Error #2031: Socket Error.
at Untitled_fla::MainTimeline/Untitled_fla::frame1()
The Flash cannot connect to Arduino's Serial Proxy. Make sure the proxy is running and that the port listed in the Arduino IDE (5331 for example) is the same port as in this Flash source code line:
var arduino:Arduino = new Arduino("127.0.0.1",5331);
Flash cannot find the as3glue library. Please check and repeat step 5. It seems that there might be a bug in Flash CS3 where settings get lost if you do not have an Actionscript file open when you change the settings. Also, if Flash crashes after you changes Preferences, those changes are lost.
Reason: you either have the wrong firmware running on your Arduino board or something went wrong during the upload of Firmata. Check and repeat step 4.